Efficiently Managing Multiple Rental Properties Using QuickBooks Online (QBO) Class and Location Functions

When you have multiple rental properties, you might need to keep track of the revenue and expenses for each property.
By efficiently tracking the revenue and expenses of each rental property, owners can benefit in several key areas:
- Profitability Analysis: Understand which properties generate the best returns.
- Cash Flow Management: Ensure liquidity for expenses and investments.
- Expense Optimization: Identify and reduce unnecessary costs.
- Tax Efficiency: Maximize deductions and reduce tax liabilities.
- ROI Evaluation: Measure returns on investment for each property.
- Underperforming Properties: Spot and address underperformers.
- Capital Planning: Plan for repairs and upgrades to increase value.
- Vacancy & Rent Trends: Optimize rent pricing and minimize vacancy rates.
- Tenant Management: Improve rent collection and tenant performance.
- Equity Monitoring: Track property equity for refinancing or selling decisions.
- Forecasting: Project future financial outcomes for strategic planning.
- Risk Management: Identify and address financial risks proactively.
This structured approach helps owners optimize portfolio performance, make informed decisions, and ultimately maximize returns while minimizing risks.
Effective Use of Accounting Software for Managing Multiple Rental Properties
As we all know, the quality of the output depends on the quality of the input. If the books are not set up properly and the bookkeeping is inaccurate, the reports generated will be unreliable and potentially misleading. So, how can accounting software be used effectively to manage multiple rental properties and produce valuable, dependable reports? In this article, we’ll explore how to achieve this using QuickBooks Online (QBO) as an example.
Chart of Accounts
When setting up a chart of accounts, many people create separate accounts for each property. While this approach captures property-specific details, it can result in an overly long and cumbersome chart of accounts. For instance, the Income Statement may look as follows (numbers are for demonstration purposes):
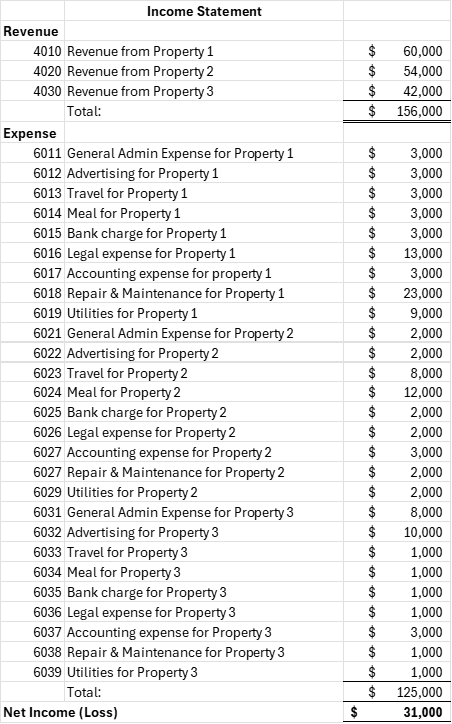
From the above Income Statement, you cannot easily determine which property is profitable or identify potential issues with individual properties.
An alternative approach is to use a standardized set of revenue and expense accounts while leveraging QBO’s “Class” and “Location” functions to allocate transactions to specific properties. This approach results in a more streamlined and organized Income Statement, such as the one below:
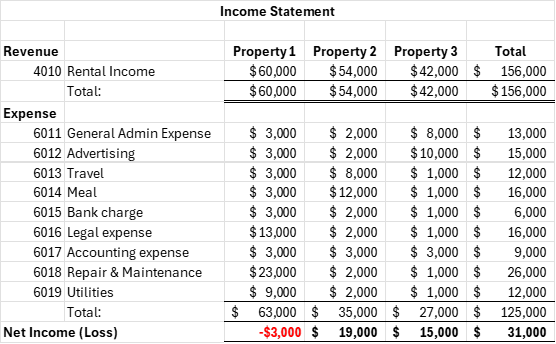
Using the “Class” or “Location” function in QBO eliminates the need to create separate accounts for each property in the chart of accounts.
Benefits of Income Statement by “Class” or “Location”
This method provides an Income Statement that can quickly reveal insights into each property’s performance. For example:
- Property 1: It is not profitable. The high repair and maintenance expenses suggest the property might be old or require significant upkeep. Additionally, the utilities expenses warrant a closer look. The legal expenses indicate potential disputes or legal issues.
- Property 2: The travel and meal expenses are significantly higher than for other properties, which warrants further investigation.
- Property 3: The general administrative expenses are unusually high, suggesting possible overspending on supplies or other costs. The elevated advertising expenses also need scrutiny.
This Income Statement format allows you to quickly identify issues and make informed decisions. By analyzing expenses and trends for each property, you can pinpoint problem areas and take corrective actions promptly.
How to Set Up “Class” or “Location” in QuickBooks Online (QBO)
The following is a quick summary of the steps to set up ‘Class’ or ‘Location’ for multiple properties in QuickBooks Online (QBO). For detailed or updated instructions, please refer to the QuickBooks Online website.
To track multiple rental properties efficiently in QBO, follow these steps to set up the “Class” or “Location” feature:
1. Turn on Classes or Locations
- Go to Settings (gear icon) in the upper-right corner.
- Under Advanced, select Categories.
- Enable either Track Classes or Track Locations, or both if needed (e.g., use Locations for properties and Classes for types of income/expenses).
- Click Save to apply the settings.
2. Set Up Classes (for Each Property)
- Go to Settings > All Lists under the Lists section.
- Select Classes.
- Click New to create a class for each property (e.g., “Property 1,” “Property 2,” etc.).
- Assign a descriptive name for each class and click Save.
- Repeat for all properties.
3. Set Up Locations (for Each Property)
- Go to Settings > All Lists under the Lists section.
- Select Locations.
- Click New to create a location for each property (e.g., “Property A,” “Property B,” etc.).
- Name each location accordingly and click Save.
4. Assign Classes or Locations to Transactions
- When entering an Invoice, Expense, or Journal Entry, look for the drop-down menu for Class or Location.
- Select the appropriate Class or Location for the transaction to track revenue and expenses for specific properties.
Managing multiple rental properties effectively requires accurate bookkeeping and strategic financial oversight. By utilizing the “Class” and “Location” functions in QuickBooks Online, property owners can gain valuable insights, streamline their accounting processes, and make data-driven decisions to maximize returns.
If you need assistance setting up your accounting system or optimizing your financial management strategy, the Smythe Cloud Accounting Team and Smythe Privco Team are here to help. With expert guidance and tailored solutions, we can support you in achieving your property management goals and unlocking the full potential of your rental portfolio. Contact us today to learn more about how we can assist you.